Custom embroidered patches are a fantastic way to personalize jackets, bags, and hats. They are also one of the most popular items for home-based embroidery businesses. While creating a patch from scratch can seem daunting, PE-Design 11 simplifies the entire workflow with its dedicated Embroidered Patch Wizard.
This powerful tool automates the process of creating a durable, professional-looking border, turning any design into a stitch-ready patch with just a few clicks.1 This guide will walk you through the entire process, from initial design to the final finished patch.
What You’ll Need
- PE-Design 11 Software
- Embroidery Machine
- Base Fabric: A sturdy, non-stretch fabric like poly twill, canvas, or denim works best.4
- Stabilizer: A heavy-duty, cut-away or tear-away stabilizer.
- Embroidery Threads
- Heat-Seal Backing (Optional): An iron-on adhesive for making your patch easy to apply.
- Sharp Scissors
Step 1: Designing Your Patch in Layout & Editing
Before you can use the wizard, you need a design. You can create this directly in the Layout & Editing window of PE-Design 11.
Create Your Inner Design
Using the Text and Shapes tools, create the design that will be the center of your patch.5 This could be a name, a monogram, a logo, or a combination of elements. For this example, let’s create a simple circular patch with a name in the middle.
- Use the Text tool to type your desired text.
- Go to the Home tab, click Shapes, and select the circle tool. Draw a circle around your text. This circle will become the border of your patch.
- Adjust the size and position of your text and the circle until you are happy with the layout. A helpful tip is to select both the text and the shape, then use the Arrange > Layout > Move to Center tool to perfectly align them.6
Group Your Design Elements
It’s a good practice to group all the elements of your patch design together. Select all the objects (text and shapes), right-click, and choose Group. This ensures the entire design is treated as a single unit when you use the wizard.6
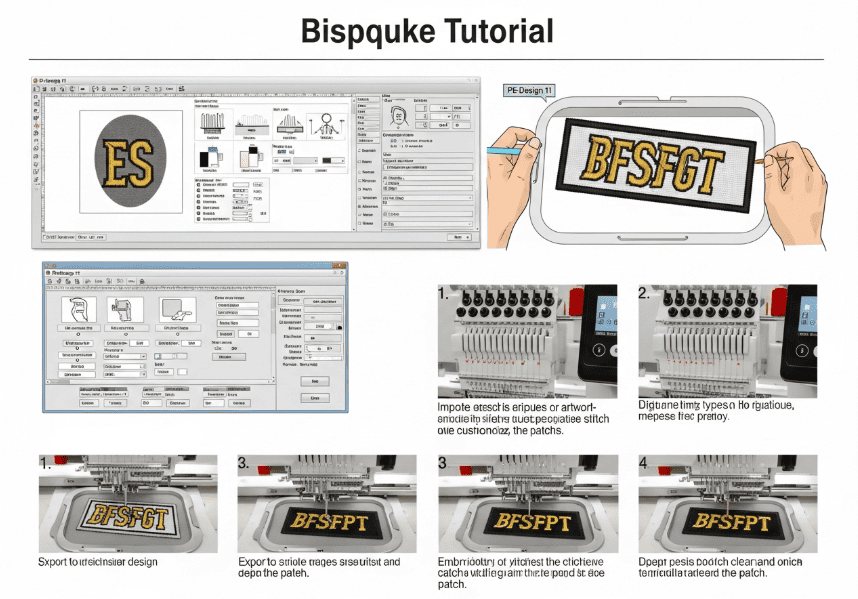
Step 2: Using the Embroidered Patch Wizard
With your design created and selected, it’s time to let the wizard work its magic.
- Make sure your grouped design is selected on the design page.
- Navigate to the Home tab and click the Embroidered Patch Wizard icon.1
- The wizard will automatically analyze your design and add the necessary steps to create a patch, including a durable satin stitch border and a final cutting line.8 For most simple patches, the default settings are sufficient. Click
OK.
You will now see new steps added to your Sewing Order pane. The wizard has automatically created the sequence for stitching a perfect patch.
Note: The Embroidered Patch Wizard cannot be used if your design contains text that has the “Name Drop” attribute applied.2
Step 3: The Stitch-Out Process Explained
The key to a good patch is a stable foundation.
- Hoop Your Stabilizer: Tightly hoop two layers of heavy tear-away or one layer of heavy cut-away stabilizer. Do not hoop your patch fabric yet.
- Stitch the Placement Line: Load the design into your machine. The first color stop will be a running stitch that outlines the shape of your patch. Stitch this directly onto the stabilizer.
- Place Your Fabric: Remove the hoop from the machine (but do not un-hoop the stabilizer). Place a piece of your patch fabric over the stitched outline, making sure it completely covers the area. You can use a temporary spray adhesive to hold it in place.
- Stitch the Tack-Down and Inner Design: Return the hoop to the machine. The next steps will stitch a tack-down line to secure your fabric, followed by all the inner elements of your design (the text and any other graphics).
- Stitch the Border: The final embroidery step will be the thick, durable satin stitch that creates the patch’s border.
Step 4: Finishing Your Custom Patch
With the embroidery complete, it’s time for the final touches.
- Remove from Hoop: Take your project out of the hoop and tear or cut away the excess stabilizer from the back.
- Apply Heat-Seal Backing (Optional): If you want to create an iron-on patch, cut a piece of heat-seal adhesive slightly larger than your patch. Place it on the back and press with an iron according to the manufacturer’s instructions, using a pressing cloth to protect the threads.4
- Cut Out the Patch: Using a pair of sharp scissors, carefully cut out your patch along the edge of the satin stitch border. Be careful not to snip any of the border stitches.
Your custom embroidered patch is now complete and ready to be sewn or ironed onto your favorite garment!
Frequently Asked Questions (FAQs)
What is the best stitch for a patch border?
A wide, dense Satin Stitch is the standard for creating a durable and professional-looking patch border. The Embroidered Patch Wizard in PE-Design 11 automatically creates this for you.
Can I make a patch without the wizard?
Yes, but it requires more manual work. You would need to manually digitize a placement line, a tack-down stitch, and a wide satin stitch border around your design, ensuring the sewing order is correct. The wizard automates this entire process.
What fabric should I use for patches?
For a classic, sturdy patch, non-stretch fabrics are best. Polyester twill is the traditional material used for professional sports patches, but canvas, denim, and heavy felt are also excellent choices.4