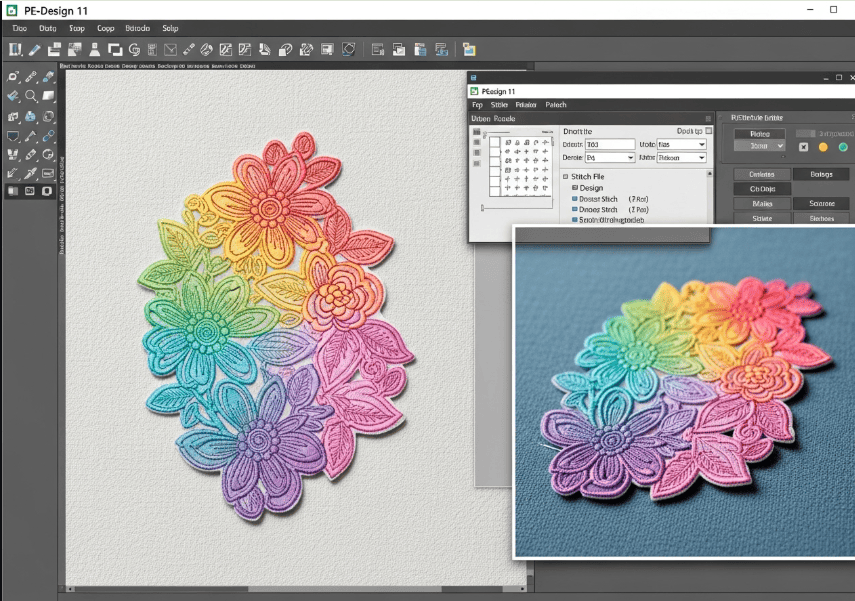
Of all the powerful tools within PE-Design 11, few capture the imagination quite like PhotoStitch. This remarkable feature allows you to transform a cherished photograph—a family portrait, a beloved pet, a scenic landscape—into a detailed, textured work of embroidered art. It’s a process that feels like magic, blending technology and creativity to produce truly unique keepsakes.
While the results can be breathtaking, the process can seem intimidating to a beginner. This ultimate guide will demystify PhotoStitch, walking you through every step of the wizard, from selecting the perfect image to fine-tuning the settings for a flawless stitch-out.
What is PhotoStitch and How Does it Work?
PE-Design 11 offers two distinct PhotoStitch modes, found under the “Image” tab:
- Photo Stitch 1: This is the more realistic version. It layers multiple thread colors on top of each other to blend tones and create a detailed, almost painted effect. This is the mode we will focus on in this guide.
- Photo Stitch 2: This mode produces a more abstract, stylized effect. It typically uses fewer colors, each stitched in straight lines at different angles to create the image.1
The PhotoStitch wizard analyzes the colors and contrast of your chosen image and converts that data into a complex map of stitches, creating shading and detail through thread.
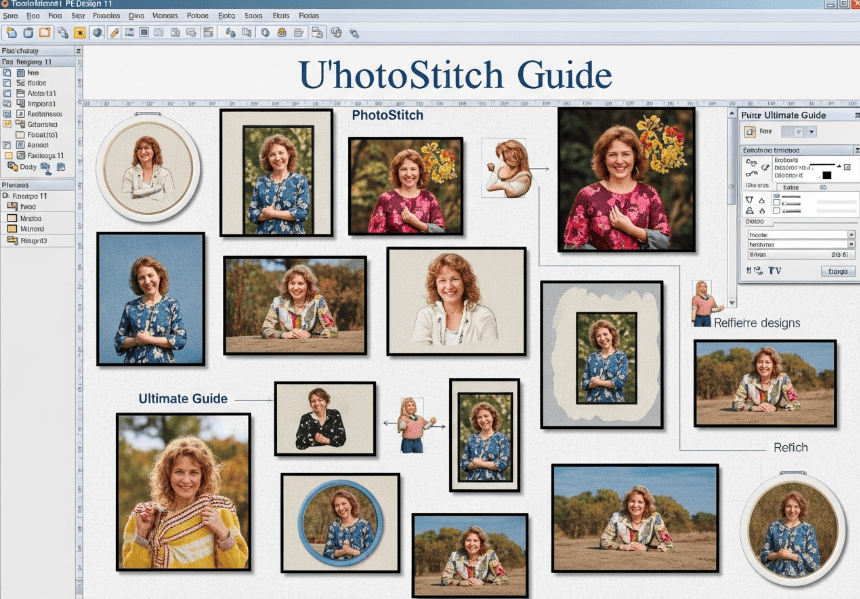
Step 1: Choosing the Perfect Photograph for PhotoStitch
The success of your final embroidery is heavily dependent on the quality of your starting image. While you might think the highest resolution is most important, the key factor is actually contrast.
Contrast is Key
The PhotoStitch wizard needs clear information to separate different areas of the photo.
- Ideal Photos: Images with good, clear separation between the main subject and the background work best.2 A photo of a person against a simple, uncluttered background is much easier for the software to interpret than a person standing in a busy forest.2
- The Contrast Test: Look for photos with good lighting and a distinct range of light and dark areas. Pictures with very little contrast (e.g., a white dog on a white blanket) will be difficult for the wizard to process because it can’t easily define the subject’s edges.1
H3: Does Image Quality Matter?
While a high-resolution image is always helpful, it’s not the only thing that matters.
- Low-Resolution Can Work: Some of the best PhotoStitch designs have been created from older, lower-resolution photos.1 As long as the contrast is good, even an old family photo scanned into the computer can produce beautiful results.
- Lighting Over Pixels: A well-lit photo with sharp details and good contrast will always produce a better result than a blurry, high-resolution photo with poor lighting.2
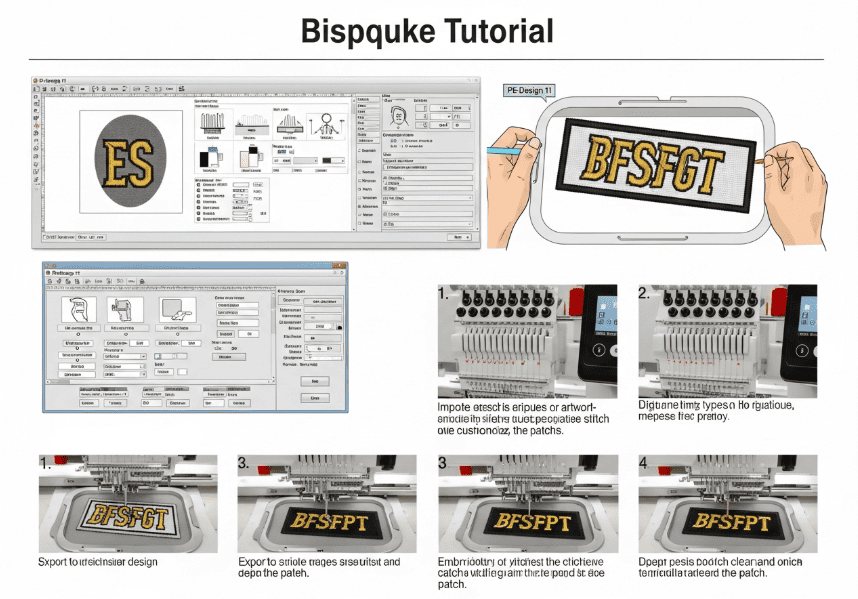
Step 2: A Step-by-Step Walkthrough of the PhotoStitch Wizard
Once you have your image, it’s time to launch the wizard and begin the conversion process. This is a multi-step process, but the software guides you through it clearly.3
Launching the Wizard
- Navigate to the [Image] tab on the top ribbon.
- Click on **** in the group. For this guide, we will use the [Color] option to create a full-color design.6
Importing and Masking Your Image
The first step in the wizard is to select your image file.3 After you select your photo, you will be presented with a masking tool. This is where you tell the software which part of the image you want to embroider.
- Using the Mask: Use the drawing tools to create a clipping mask around the subject of your photo.2 This allows you to crop the design or completely remove the background, which is highly recommended for a clean, professional look.2
Setting the Parameters
The next screen is where you define the core settings for your embroidery design.3
- Thread Chart: Select the brand of thread you will be using. This is important because the software will use the specific colors available in that brand’s palette to build your design.7
- Max. Number of Colors: This sets the maximum number of thread colors the wizard will use. The default is typically ten, which is a great starting point.1
- Run Pitch: This setting controls the stitch length. A lower value will create shorter, finer stitches.7
- Detail: Sliding this toward “Fine” will create a more detailed pattern with more stitches.7
Fine-Tuning Your Design
Before finalizing, the wizard gives you powerful tools to refine the output.
- Brightness / Contrast: Use these sliders to make final adjustments to the image. Sometimes, slightly increasing the contrast can dramatically improve the final stitch-out by helping the software better define edges.2
- Select from Candidates: This is an incredibly useful feature. Clicking this button will generate nine small previews of your design, each with different automatic adjustments to brightness and contrast. You can often find the best possible version of your design by choosing one of these candidates.7
Pro Tips for Flawless PhotoStitch Results
Following the wizard is the first half of the battle. These pro tips will help you avoid common frustrations and ensure your final product is something you can be proud of.
Start with a Larger Hoop
PhotoStitch designs are dense and require space to render detail effectively. It is highly recommended to use a hoop that is at least 5×7 inches (13x18cm) or larger.1 The best results often come from larger designs.
Trust the Wizard’s Color Choices
When you look at the list of suggested thread colors, some may seem very strange (e.g., a shade of green in a skin tone). Trust the process. PhotoStitch works by layering colors to create blended tones. A color that looks odd on its own is often essential for creating the perfect shadow or highlight when stitched. Avoid changing the colors too much, as it can disrupt this delicate layering effect.8
Trim Jump Stitches Religiously
This is the most important tip for the actual stitching process. PhotoStitch designs create many jump stitches between color areas. You must stop the machine and trim these jump stitches after every single color change. If you don’t, they will get caught and tangled in subsequent layers, ruining the design.
Always Do a Test Stitch
What you see on the screen is a good preview, but it’s not a perfect representation of the final product. The only way to know for sure how your design will look is to do a test stitch-out on a scrap of similar fabric before committing to your final garment or project.2
Frequently Asked Questions (FAQs)
What is the difference between Photo Stitch 1 and Photo Stitch 2?
Photo Stitch 1 creates a realistic, detailed design by layering many colors to create blended tones. Photo Stitch 2 creates a more abstract, stylized design using fewer colors stitched in distinct, angular blocks.
My PhotoStitch design looks messy and tangled. What went wrong?
The most likely cause is untrimmed jump stitches. You must trim the threads that jump between areas after every color change. Other causes could be poor contrast in the original photo or using the wrong type or amount of stabilizer for such a dense design.
Can I use a low-resolution photo from my phone?
Yes. While a high-quality image is always a good starting point, even lower-resolution photos can produce beautiful results as long as they have good lighting and strong contrast between the subject and the background.2
How many colors should I use for the best result?
More is not always better. Start with the software’s default suggestion (usually 10 colors) and see how the preview looks. Sometimes, increasing the number of colors adds unnecessary detail and stitch time without significantly improving the design.1 Experimentation is key.